festively made

Make every day a celebration!

  • About
  • Recipes
  • Events
  • Projects
  • Family
  • Finds
You are here: Festively Made » dessert

So So Good Salted Carmelitas

September 1, 2014 By Elizabeth Leave a Comment

Salted Carmelitas | Festively Made
Happy Labor Day to you! I hope everyone is enjoying a nice day off. We celebrated the day yesterday with a little get-together by the pool. It just might be the last hurrah of the summer poolside, and I really wanted to make a new dessert. I’ve seen this recipe for Carmelitas floating around Pinterest for some time now…first from Lulu the Baker and then from Averie Cooks, among others. The pictures were enough to make your mouth water.

Salted Carmelitas | Festively Made
Both recipes call for making your own caramel sauce using 30+ caramel candies, but alternatively said you could use store-bought caramel sauce. Averie Cooks mentioned the salted caramel sauce from Trader Joe’s, which I have seen before, but never purchased. I don’t know about you, but sauce already made vs unwrapping 30+ caramel candies and making my own sauce. Yeah, it wasn’t a tough decision. Besides, I thought the salted caramel sauce would be SO good.

Salted Carmelitas | Festively Made
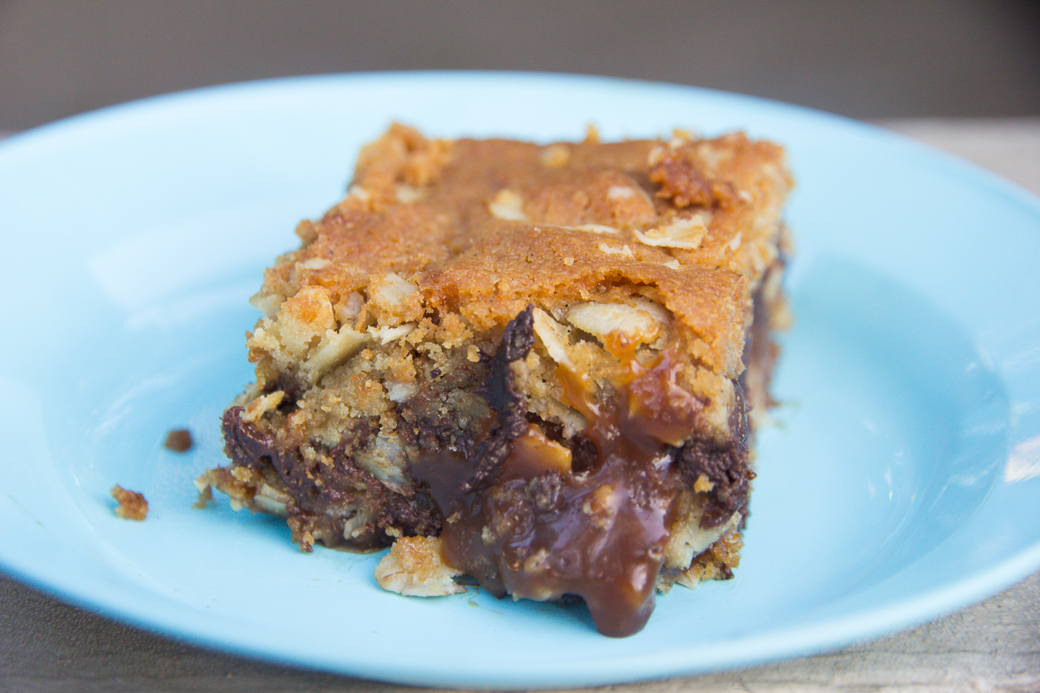
These Salted Carmelitas are really easy to make, too. I love a recipe that doesn’t dirty my mixer! You mix this all by hand, and with the store-bought caramel sauce, it just comes together that much quicker. The hardest part was waiting for the Salted Carmelitas to cool off so we could taste them. They were so worth the wait. The gooey deliciousness did not disappoint. The Salted Carmelitas are just oozing with caramel and chocolate. What could be bad about that?!! My husband thought they were a tad too sweet, but that didn’t stop him from polishing off a bar or two. Just saying! Our guests seemed to enjoy them, too.

Salted Carmelitas | Festively Made
These Salted Carmelitas need a chunk of time to cool off before serving so keep that in mind in you are making the recipe! Enjoy!

Salted Carmelitas

Print recipe
  • Print with main photo
  • Print text only
Salted Carmelitas
Serves 9-12
Prep time 15 minutes
Cook time 30 minutes
Total time 45 minutes
Allergy Milk, Wheat
Meal type Dessert
Misc Freezable
Website Adapted from Lulu the Baker AND Averie Cooks

Ingredients

  • 3/4 cups unsalted butter (1 1/2 stick)
  • 3/4 cups light brown sugar (packed)
  • 1 tablespoon vanilla extract
  • 1 cup all-purpose flour
  • 1 cup whole-rolled old fashioned oats (not instant or quick cook)
  • 1 teaspoon baking soda
  • 1 cup semi-sweet chocolate chips or chunks
  • 1 1/2 cup salted caramel sauce (I purchased mine at Trader Joe's; I used the entire jar)

Directions

Step 1
Preheat oven to 350 degrees F. Spray an 8 x 8-inch pan with cooking spray (I used Pam Baking Spray). Set pan aside.
Step 2
In a separate bowl, combine melted butter, brown sugar, vanilla, flour, oats, and baking soda. Mixture will be thick.
Step 3
Pat half of the oatmeal mixture evenly into the bottom of the 8 x 8-inch pan. This does not have to be exact. Use your best judgment! Bake at 350 degrees F for 10 minutes.
Step 4
Remove pan from oven and sprinkle chocolate chips or chunks over the crust. Pour caramel sauce evenly over the chocolate. Evenly crumble the remaining oat mixture over the caramel.
Step 5
Return to oven and bake for an additional 15-20 minutes, until the edges are lightly browned.
Step 6
Remove from oven and allow bars to cool completely before slicing and serving, giving the melted caramel time to firm up. This can take up to 4 hours, or overnight, at room temperature. If you are pinched for time, you can speed up the process by placing it into the refrigerator. Bars will keep in an airtight container at room temperature for up to 1 week, or in the freezer for up to 4 months.

Filed Under: Blog, Recipes Tagged With: carmelitas, dessert, recipe, salted

What’s Cooking This Week: Peach Plum Nectarine Cobbler

July 16, 2014 By Elizabeth 1 Comment

Peach Plum Nectarine Cobbler | Festively Made
So, does this ever happen to you? There are certain items we buy every week at the grocery store because our kids, who are not the best eaters, like them. You can bet that there will always be a plethora of yogurt in my refrigerator and fruit. At least some of the food they like is healthy, right? I do most of the shopping, but occasionally my husband goes to the store to pick up a few things. And that’s when it inevitably happens. Somehow we have both purchased the usual items, and we are overloaded with them.

Peach Plum Nectarine Cobbler | Festively Made
This past week, the hubs and I both went crazy at the store buying peaches, plums and nectarines. Like really crazy. There was no way we could eat all of this fruit. I decided something needed to be done to use it up as the fruit was definitely on its way out. Enter the cobbler. I’ve mentioned my love of all things pie before, and the same applies to cobbler, crisps and whatever else you can make out of fruit. I like fruity desserts. There, I said it. I’d much rather have cobbler than say, a slice of cake or brownies. I just really really like fruity desserts.

Peach Plum Nectarine Cobbler | Festively Made
I found a recipe on Baking Bites and decided to give it a whirl. Granted, I adapted it a bit to fit the fruit I had on hand. Presenting Peach Plum Nectarine Cobbler! This is a good basic cobbler recipe. It’s not fancy. It’s not pretentious. It’s not complicated. It’s just good. I can see substituting whatever abundance of fruit you have and still realizing a fabulous result. Definitely taste your fruit before adding the sugar to the bowl. If your fruit is not that sweet, consider adding a little extra sugar than the recipe calls for to compensate. Enjoy!

Peach Plum Nectarine Cobbler | Festively Made

Peach Plum Nectarine Cobbler

Print recipe
  • Print with main photo
  • Print text only
Peach Plum Nectarine Cobbler
Serves 6 - 8
Prep time 15 minutes
Cook time 45 minutes
Total time 1 hour
Allergy Milk, Wheat
Meal type Dessert
Misc Serve Cold, Serve Hot
Website Adapted from Baking Bites

Ingredients

  • 3 peaches (peeled, pit removed and cut into 6-8 pieces)
  • 4 plums (unpeeled, pit removed and cut into 4 pieces)
  • 3 nectarines (peeled, pit removed and cut into 6-8 pieces)
  • 1 1/2 teaspoon cornstarch
  • 2 tablespoons sugar (or adjust to the sweetness of your fruit)
  • 1 1/2 cup flour
  • 1/3 cup sugar
  • 1 teaspoon baking powder
  • 1/4 teaspoon salt
  • 6 tablespoons butter (melted and cooled)
  • 1/4 cup milk
  • 1 teaspoon vanilla extract

Directions

Step 1
Preheat oven to 350 degrees. Taste your fruit before adding sugar. Place prepared fruit into a large bowl and toss gently with 2 TBS of sugar and the cornstarch. Depending upon the sweetness of your fruit, you may need to use additional sugar for taste preference.
Step 2
In medium bowl, whisk together flour, 1/3 cup sugar, baking powder and salt.
Step 3
Pour in melted butter, milk and vanilla and stir with a fork until the dough comes together into a soft, slightly sticky dough.
Step 4
Arrange fruit in an even layer in 8 x 8 (2 quart) baking dish. Break up cobbler topping with your fingertips and spread it evenly over the fruit. It is fine if some of the fruit is still visible.
Step 5
Bake for 45-50 minutes, until topping is golden brown and fruit is tender when pierced with a sharp knife. Tent the cobbler with aluminum foil for the last 5 minutes if you feel your cobbler is starting to get too brown. Allow to cool for at least 15 minutes before serving.

Filed Under: Blog, Recipes Tagged With: cobbler, dessert, nectarine, peach, plum

  • Email
  • Pinterest
  • Twitter

Hey y’all!

Writer. Wife. Mom x 2. Southern girl. Fearless cook. Over-the-top party planner. Amateur photographer. Read More…

Follow on Bloglovin

Copyright © 2025 · Graceful theme by Restored 316

Copyright @ 2014 Festively Made